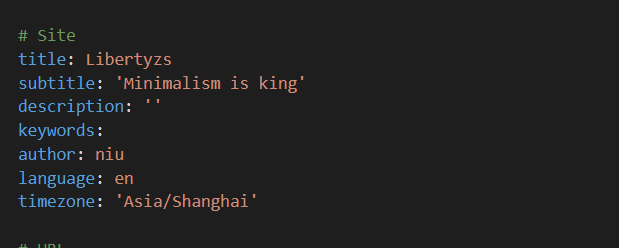
# Site
# 设置博客的标题
title: Your Blog Title
# 子标题,可选
subtitle: 'xxxxx'
# 博客的描述,可选
description: ''
# 关键词,可选
keywords:
# 作者信息
author: Your Name
# 博客语言
language: en
# 时区
timezone: ''
# Sidebar sidebar: widgets:# Plugins to be enabled (profile, category, tag, archive, recent_posts) normal:# Scroll along with the page -profile sticky:# Stick to the top of the page -category -tag -archive -recent_posts
# Widget behavior archive_type:'monthly' recent_posts_limits:5 categories: max_depth:# Maximum depth of categories displayed in the widget (null for unlimited)
# Personal info avatar:images/icon/icon_t2.jpg ## 图像照片,和上面的 brnner -url一样 author:Liberty subtitle:JavaAdventure links: -name:Twitter icon:fa-brandsfa-twitter# Find icon codes at https://fontawesome.com/search url:https://twitter.com -name:Steam icon:fa-brandsfa-steam url:https://store.steampowered.com -name:GitHub icon:fa-brandsfa-github url:https://github.com
comment: valine: enable:true## 评论 appId: appKey: placeholder:Justgogo pageSize:10 highlight:true##高亮显示 serverURLs: # Other supported parameters can be added here if needed # Visit https://valine.js.org/configuration.html for more details
#Analytics gauges_analytics:true## 选开 google_analytics:true#UA-xxxxxx baidu_analytics:true# ddxxxxxxxxxxxxxxxxx In the https://hm.baidu.com/hm.js? Afterwards